Cats and Lasers

I finally am a full member of the internet – I am the proud servant of two cats! To keep them entertained when me and my wife are at work, I built a web-controlled laser-turret:

At its heart is an ESP2866 on an nodemcu amica v2, a cheap servo pan/tilt kit with small 9g servos and some no-brand laser-module rated for 5v and 40mA.

In this build-log I will write about the process of creating it.

The code and all files I used can be found in my github-repo: https://github.com/TobiasWeis/cats_and_lasers.

Here is the machine in action with one of the test subjects:

As always, in the beginning was a rough idea, a breadboard and a mess of jumper-wires, with the usual quirks and problems: loose or sketchy contacts, wires in the way, a confusing colorfull mess.

I created a python-script to simulate the movements of the turret (can be seen on the screen in the background) using some sine/cosine-math.


However, when everything was working, I wanted a more permanent solution, and quickly created the schematic in EAGLE – there even is a part-library for the NodeMCU-Controller I was using. (I know,  the interfaces for the contacts of the servos are messed up, in my case I just switched the pins inside their casing. As I own one of those very small CNC machines, I took the board-file from eagle to http://chilipeppr.com/jpadie, an online CAM processor that is able to read eagle board-files and output gcode, which can be sent to the CNCs controller. I mirrored the board along the X-axis in jpadie, as it will be milled on the bottom-layer of the board.

First I fitted a very sharp, 0.1mm and 10° engraving bit into the CNC, then I fastened the bare PCB using 3d-printed holders. Using the autolevel-feature of jpadie and connected probe-wires, I measured the real heights of the PCB at over 100 evenly spaced points. Milling took less than thirty minutes, and then I quickly soldered some pins and headers onto the board, and inserted the components.


All that was left to do was to cut out some holes (using a Dremel with a cutting-disc and a regular drill) from a casing for the servo and the cables, wrap the cables nicely, and polish the software.


The code is straight forward and based on standard libraries. I was using the arduino IDE to create and compile the code for the ESP2866, as there are easy-to-use libraries to quickly connect to a WiFi-network, and also handle webserver-tasks.

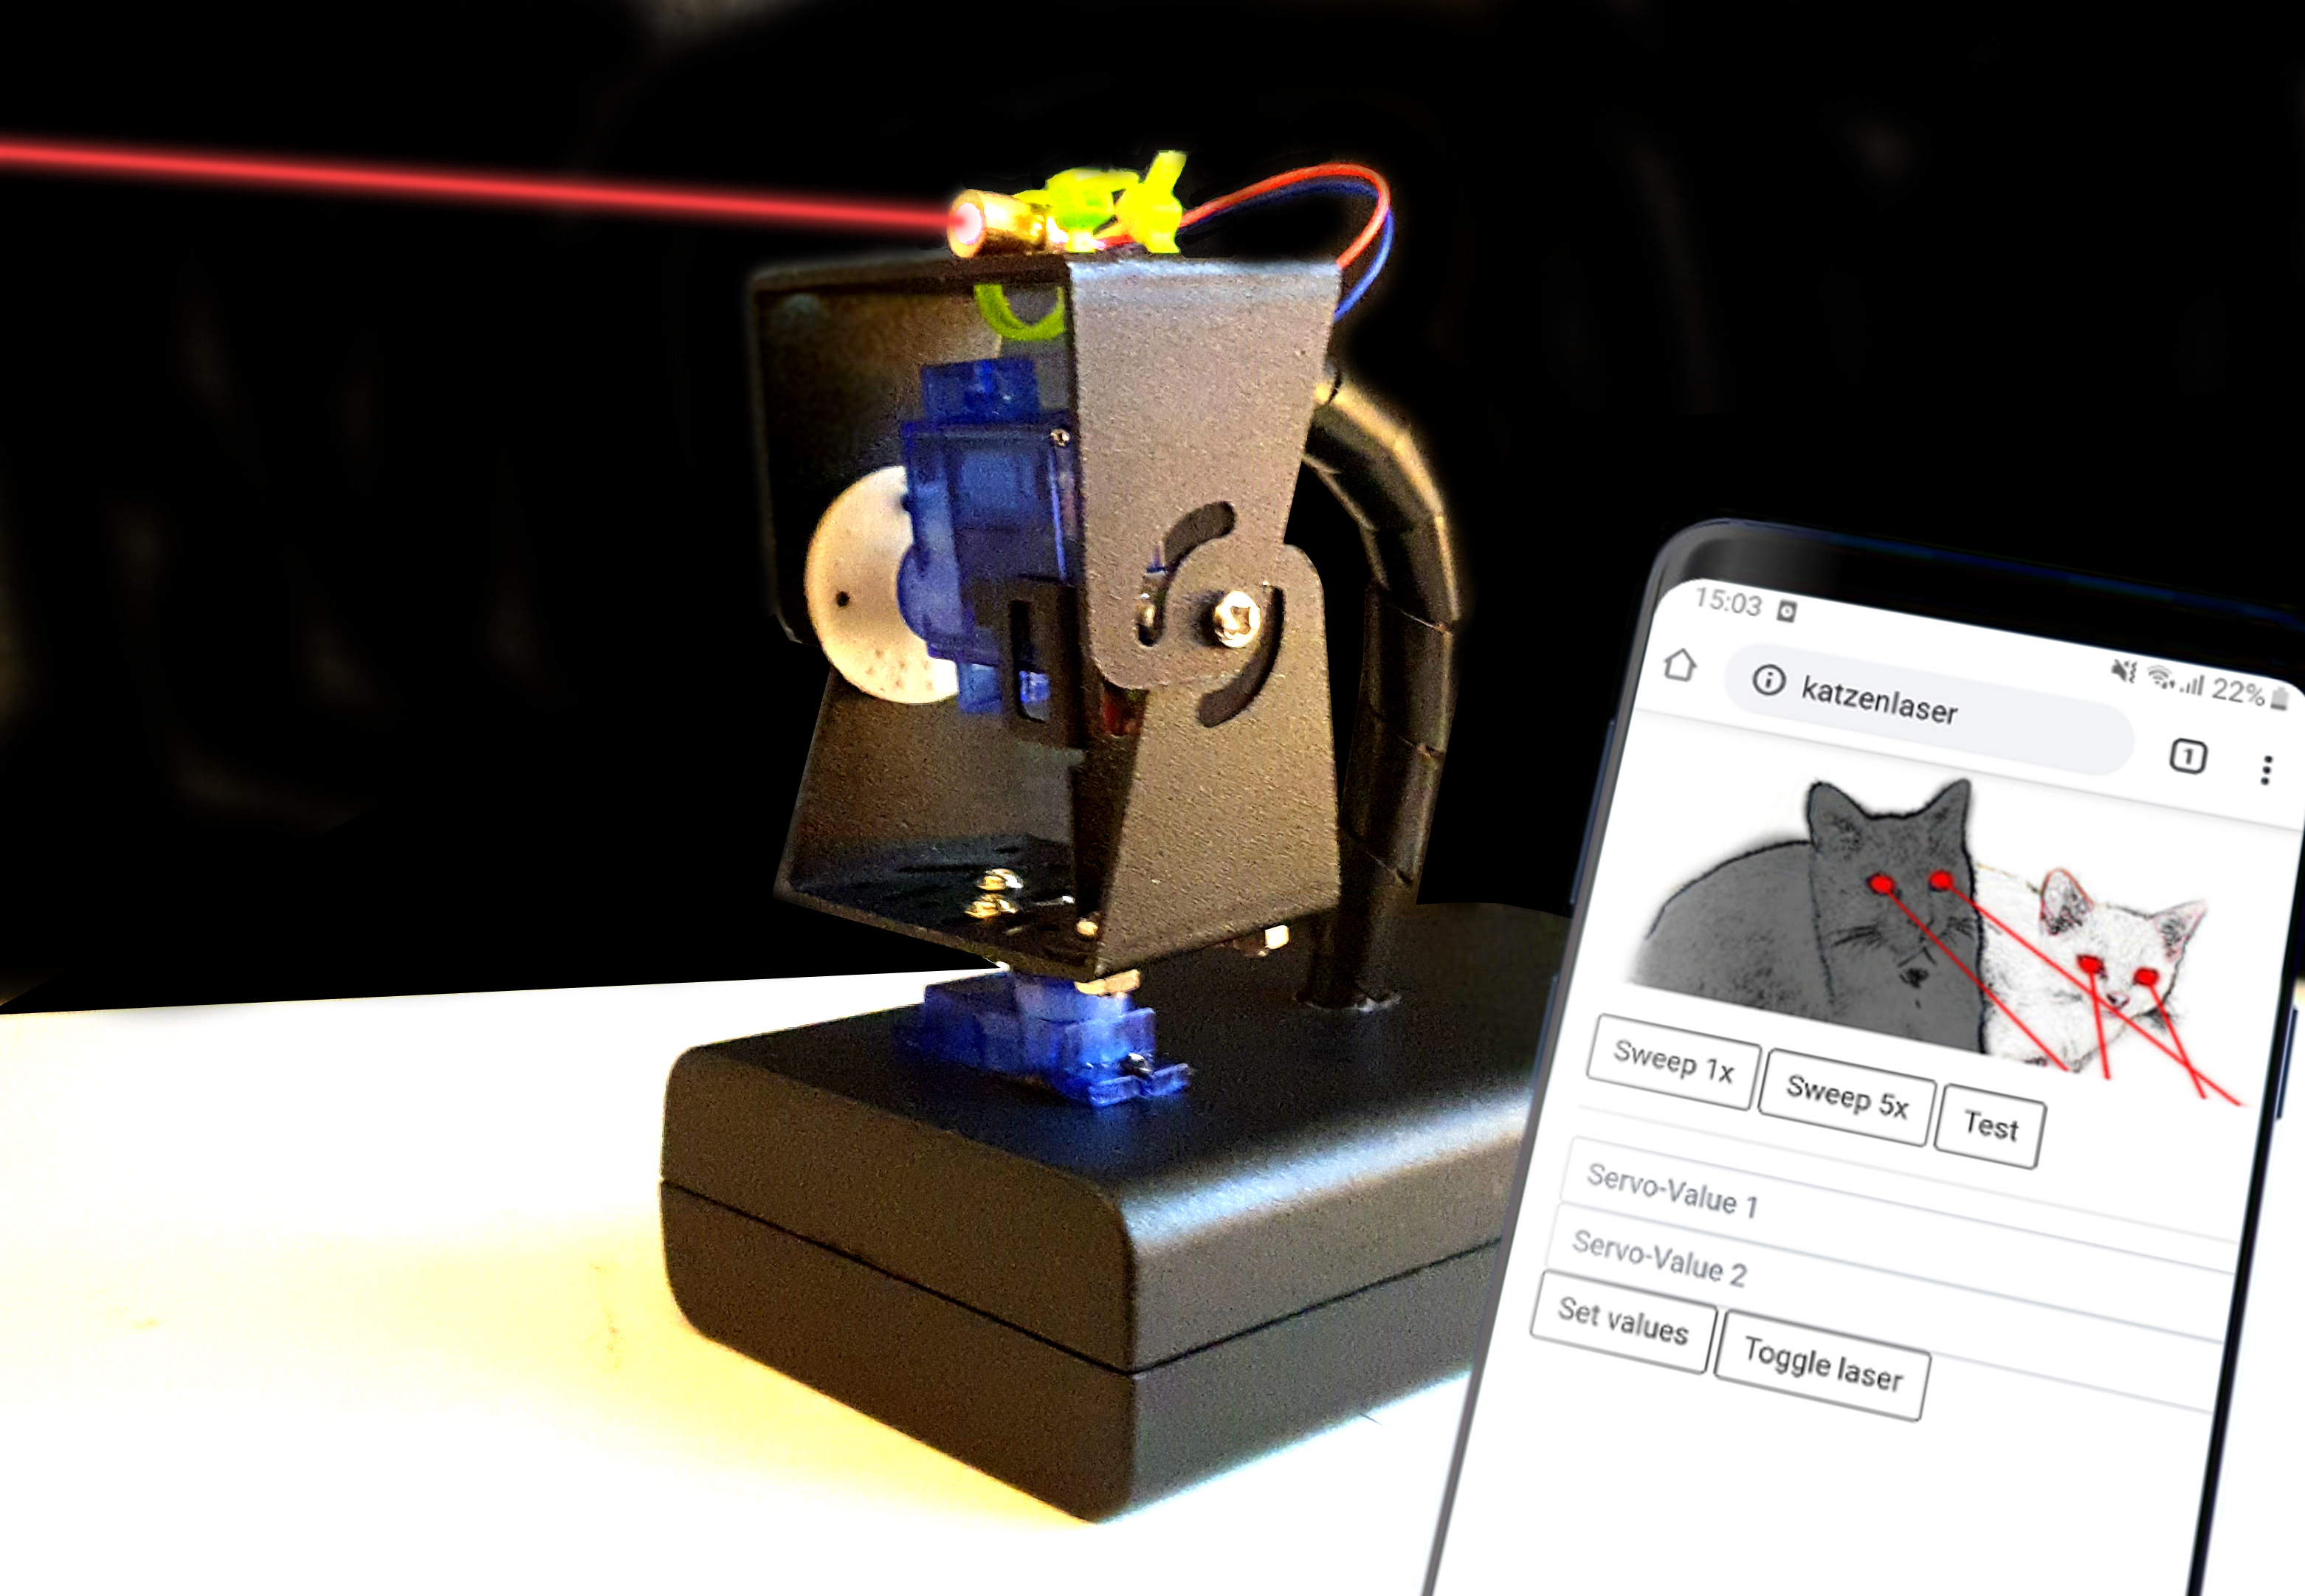
I gave the device a static IP in my router and assigned a hostname to it. That way, the website can simply be called by inserting http://katzenlaser in the browsers URL field. With a little bit of bootstrap and css, the website looks like this:

The Wifi is set up to connect to our access-point, and the webserver “hosts” a page to display and is able to handle post-requests sent by buttons. The arduino-code below handles said tasks, and calls functions to control the servos and the laser.


[showhide type=”pressrelease” more_text=”Show Arduino C-code for ESP2866 NodeMCU (%s More Words)” less_text=”Hide Code” hidden=”yes”]

#include <ESP8266WiFi.h>
#include <ESP8266WebServer.h>
#include <Servo.h>
/* needs to be placed in separate header,
 * otherwise the arduino ide will "escape"/create prototypes
 * for javascript "function" statements and destroy the javascript-part
 */
#include "index.h"

#define LASER_PIN D4
#define SERVO_PAN_PIN D2
#define SERVO_TILT_PIN D3

const char* ssid = "ROUTER_SSID_HERE"; //Hier SSID eures WLAN Netzes eintragen
const char* password = "ROUTER_PWD_HERE"; //Hier euer Passwort des WLAN Netzes eintragen

ESP8266WebServer server ( 80 );
const char* www_username = "laser";
const char* www_password = "laser";

Servo servo1; // base rotation
Servo servo2; // up/down

bool isLaserOn = false;

//------------------------- Arduino-related code
void setup() {
 pinMode(LASER_PIN, OUTPUT);
 digitalWrite(LASER_PIN,LOW);

 Serial.begin(115200);
 delay(10);

 WiFi.hostname("catlaser");
 WiFi.begin(ssid,password);
 while(WiFi.status() != WL_CONNECTED){
 delay(500);
 Serial.print(".");
 }

 server.on ( "/", handleRoot );
 server.begin();
 Serial.println ( "HTTP server started" );

 Serial.println();
 Serial.println(WiFi.localIP());

 attach_servos();
 test_functionality();
 detach_servos(); // turn the pwm-pulse off to avoid noises and power consumption
}

void loop(){
 server.handleClient();
 delay(1000);
}

//------------------------- web-server-related code
String getPage(){
 return MAIN_page;
}

void handleSubmitAction(){
 String action = server.arg("execute_action");
 Serial.print(action);

 if(action == "sweep_once"){
 attach_servos();
 sweep_laser(1);
 detach_servos();
 server.send(200, "text/html", "OK");
 }else if(action == "sweep_five"){
 attach_servos();
 sweep_laser(5);
 detach_servos();
 server.send(200, "text/html", "OK");
 }else if(action == "test"){
 attach_servos();
 test_functionality();
 detach_servos();
 server.send(200, "text/html", "OK");
 }else if(action == "toggle_laser"){
 toggle_laser();
 server.send(200, "text/html", "OK");
 }else if(action == "apply_servo_value"){
 Serial.println("Servo values are ");
 Serial.println(server.arg("servo_value1"));
 Serial.println(server.arg("servo_value2"));

 int value1 = server.arg("servo_value_1").toInt();
 int value2 = server.arg("servo_value_2").toInt();

 attach_servos();

 servo1.write(value1);
 servo2.write(value2);

 delay(2000);

 detach_servos();
 server.send(200, "text/html", "OK");
 //server.send ( 200, "text/html", getPage() );
 }else{
 Serial.println("Error Servo Value");
 }
}

void handleRoot() {
 if(!server.authenticate(www_username, www_password))
 return server.requestAuthentication();

 if (server.hasArg("execute_action")){
 Serial.println("Executing action");
 handleSubmitAction();
 } else{
 server.send (200, "text/html", getPage());
 }
}

//------------------------- hardware related code
void detach_servos(){
 servo1.detach();
 servo2.detach();
}

void attach_servos(){
 servo1.attach(SERVO_PAN_PIN);
 servo2.attach(SERVO_TILT_PIN);
}

void laser_on(){
 digitalWrite(LASER_PIN, HIGH);
 isLaserOn=true;
}

void laser_off(){
 isLaserOn=false;
 digitalWrite(LASER_PIN, LOW);
}

void toggle_laser(){
 if(isLaserOn){
 digitalWrite(LASER_PIN,LOW);
 isLaserOn=false;
 }else{
 digitalWrite(LASER_PIN,HIGH);
 isLaserOn=true;
 }
}

// sweep each servo from 0 to 180
// and blink the laser to test functionality
void test_functionality(){
 // servo 1
 for(int angle=0; angle<180;angle++){ servo1.write(angle); delay(10); } for(int angle=180; angle>0;angle--){
 servo1.write(angle);
 delay(10);
 }

 // servo 2
 for(int angle=0; angle<180;angle++){ servo2.write(angle); delay(10); } for(int angle=180; angle>0;angle--){
 servo2.write(angle);
 delay(10);
 }

 // laser
 for(int num=0;num<5;num++){
 laser_on();
 delay(500);
 laser_off();
 delay(500);
 }
}

void sweep_laser(int num){
 laser_on();

 int base = 50;
 int scale = 10;

 for(int k=0; k<num; k++){
 for(int i=0; i<180;i++){ servo1.write(i); // 0 at 90 degrees, // 90 at 0 and 180 servo2.write(base + sin(deg2rad(i)*2)*scale); // @180: 90 delay(30); } for(int i=180; i>0;i--){
 servo1.write(i);
 servo2.write(base-sin(deg2rad(i)*2)*scale); // @180: 0
 delay(30);
 }
 }
 laser_off();
}

//------------------------- utility functions
int rad2deg(float rad){
 return (rad*4068)/71;
}

float deg2rad(int deg){
 return (deg*71)/4068.0;
}

[/showhide]

The frontend - a simple website with some buttons, input-fields and jquery to handle the ajax-requests - is saved as a progmem-variable in the included header-file (index.h) - there are two reasons for this, the first is readability, and the second is that the arduino-IDE will create function-prototypes when it sees the "function"-keyword - which you need to define javascript-functions. It does not care if it is inside a string or not, it will just mess up the resulting string if you try.
I wanted a nice image on the website but did not want to bother with the filesystem-plugins, so I just base64-encoded jpeg and directly inserted this string in the src-field of the img-tag.

[showhide type="pressrelease" more_text="Show encoded Website/Javascript code for ESP2866 NodeMCU (%s More Words)" less_text="Hide Code" hidden="yes"]

const char MAIN_page[] PROGMEM = R"rawliteral(
 <!DOCTYPE html>
 <html>
 <head>
 <link rel="stylesheet" href="https://stackpath.bootstrapcdn.com/bootstrap/4.3.1/css/bootstrap.min.css" integrity="sha384-ggOyR0iXCbMQv3Xipma34MD+dH/1fQ784/j6cY/iJTQUOhcWr7x9JvoRxT2MZw1T" crossorigin="anonymous">
 <img src="data:image/gif;base64,R0lGODlhAQABAIAAAAAAAP///yH5BAEAAAAALAAAAAABAAEAAAIBRAA7" data-wp-preserve="%3Cscript%20src%3D%22https%3A%2F%2Fajax.googleapis.com%2Fajax%2Flibs%2Fjquery%2F3.3.1%2Fjquery.min.js%22%3E%3C%2Fscript%3E" data-mce-resize="false" data-mce-placeholder="1" class="mce-object" width="20" height="20" alt="<script>" title="<script>" />
 <img src="data:image/gif;base64,R0lGODlhAQABAIAAAAAAAP///yH5BAEAAAAALAAAAAABAAEAAAIBRAA7" data-wp-preserve="%3Cscript%20type%3D%22text%2Fjavascript%22%3E%0A%20%24(document).ready(function()%7B%0A%20%24(%22p%22).click(function()%7B%0A%20%24(this).hide()%3B%0A%20%7D)%3B%0A%20%7D)%3B%0A%20%0A%20function%20js_submit_action(actionstr)%7B%0A%20console.log(%22js_submit_action%20called!%22)%3B%0A%20%24.ajax(%7B%0A%20type%3A%20%22POST%22%2C%0A%20url%3A%20%22%2F%22%2C%0A%20data%3A%20%7B%22execute_action%22%3Aactionstr%7D%2C%0A%20success%3A%20console.log(%22success!%22)%0A%20%7D)%3B%0A%20%7D%0A%20%0A%20function%20js_set_servo_value()%7B%0A%20console.log(%22js_set_servo_value%20called!%22)%3B%0A%20%24.ajax(%7B%0A%20type%3A%20%22POST%22%2C%0A%20url%3A%20%22%2F%22%2C%0A%20data%3A%20%7B%22execute_action%22%3A%20%22apply_servo_value%22%2C%20%0A%20%22servo_value_1%22%3A%24('%23servo_value1').val()%2C%0A%20%22servo_value_2%22%3A%24('%23servo_value2').val()%7D%2C%0A%20success%3A%20console.log(%22success!%22)%0A%20%7D)%3B%0A%20%7D%0A%20%3C%2Fscript%3E" data-mce-resize="false" data-mce-placeholder="1" class="mce-object" width="20" height="20" alt="<script>" title="<script>" />

<img src="data:image/gif;base64,R0lGODlhAQABAIAAAAAAAP///yH5BAEAAAAALAAAAAABAAEAAAIBRAA7" data-wp-preserve="%3Cstyle%3E%0A%20.btn%2C%20.btn%3Avisited%20%7B%0A%20color%3A%23333%20!important%3B%0A%20border-color%3A%23333%20!important%3B%0A%20%7D%0A%20.btn%3Ahover%2C%20.btn%3Aactive%7B%0A%20color%3A%23fff%20!important%3B%0A%20background-color%3A%20%23333%20!important%3B%0A%20%7D%0A%0A%20.form-control%3Afocus%2C%20.btn%3Afocus%7B%0A%20box-shadow%3A%200px%201px%201px%20rgba(0%2C0%2C0%2C0.075)%20inset%2C%200px%200px%208px%20rgba(255%2C0%2C0%2C0.5)%3B%0A%20%7D%0A%20%3C%2Fstyle%3E" data-mce-resize="false" data-mce-placeholder="1" class="mce-object" width="20" height="20" alt="<style>" title="<style>" />

 </head>
 <body>
 <main role="main" class="container" style="width:400px;margin-left:auto;margin-right:auto;">

<div style="width:400px;margin-left:auto;margin-right:auto;margin-bottom:20px;">
<!-- base64-encoded image as a string here -->
 <img src="data:image/jpeg;base64,ALOTOFDATA" />
 </div>

 <button class="btn btn-outline-success my-2 my-sm-0" onclick='js_submit_action("sweep_once");' value='sweep'>Sweep 1x</button>
 <button class="btn btn-outline-success my-2 my-sm-0" onclick='js_submit_action("sweep_five");' value='sweep'>Sweep 5x</button>
 <button class="btn btn-outline-success my-2 my-sm-0" onclick='js_submit_action("test");' value='test'>Test</button>

<hr>

 <input class="form-control mr-sm-2" type='text' id='servo_value1' placeholder="Servo-Value 1" aria-label="Servo-Value 1"/>
 <input class="form-control mr-sm-2" type='text' id='servo_value2' placeholder="Servo-Value 2" aria-label="Servo-Value 2"/>
 <button class="btn btn-outline-success my-2 my-sm-0" onclick='js_set_servo_value();' value='set value'>Set values</button>
 <button class="btn btn-outline-success my-2 my-sm-0" onclick='js_submit_action("toggle_laser");' value='Toggle laser'>Toggle laser</button>
 </main>
 </body>
 </html>
)rawliteral";

[/showhide]

I calculated/simulated the servo-movements using a jupyter-notebook, as I could quickly plug in some formulas and see the resulting curves without having to flash and test on the servos each time:

And finally, the parts I used:

Which means a total cost of something like 20 EUR, of course not counting in the reusable parts like breadboard, jumper-wires or the CNC...

Comments

  • Laser Toy Keeps Cats Entertained – ITmix.cz

    October 26, 2019 at 4:51 pm

    […] Cats are among the most popular domesticated creatures, and their penchant for chasing laser pointers is well known. With a pair of felines of his own to look after, [Tobi] set about making a device to help keep them entertained. […]

  • Pedro

    October 26, 2019 at 8:59 pm

    Is there any danger of the cats looking into the lasers or the beam reflecting into their eyes?

  • TobiasWeis

    October 27, 2019 at 1:49 am

    Those lasers are not really lasers as far as I understand, and are not as tightly bundled or nearly as strong.

  • Laser Toy Keeps Cats Entertained

    October 26, 2019 at 10:51 pm

    […] Cats are among the most popular domesticated creatures, and their penchant for chasing laser pointers is well known. With a pair of felines of his own to look after, [Tobi] set about making a device to help keep them entertained. […]

  • Немец собрал автоматическую лазерную указку для своих котов | Техно новости России и мира.

    October 28, 2019 at 4:31 pm

    […] «Чтобы развлечь их, когда мы с женой на работе, я построил управляемую […]

Your email address will not be published. Required fields are marked *